- Location
- North Texas
- Hardiness zone
- 8a
Before we had the garden, we had the idea to have chickens. We built a little pen for baby chicks, and ended up getting nine chickens from some friends of ours. According to the person they got them from, we should have ended up with a few roosters and the rest were supposed to be pullets (females). Instead, what we got was exactly two pullets, and seven cockerels! We ended up getting rid of all but one of the cockerels and, of course, we kept the two pullets.
Once we acclimated those out of the pen and into the larger coop, we ended up buying another 15 chicks. Those were all supposed to be pullets but we did end up with one cockerel. Out of those 15, we did have two die. They were both the same breed (out of the four different breeds we got), so we're assuming a weak breed or they had some sort of disease before we got them.
Anyways, today we now have a total of 12 laying chickens and 2 roosters, only one of which seems to be interested in the females (or maybe the larger rooster won't let the little guy have a turn).
We're getting 9-10 eggs every day (more than we can eat on our own), and a constant source of free fertilizer, which we'll start composting as soon as this cold spell is over. All these chicken droppings should help make for a mighty hot compost pile!
Anyways, here's a quick tour of the ol' chicken coop, and some of the chickens. I just wanted to show them off because I think they're a fine addition to any gardener's farm/ranch/yard.
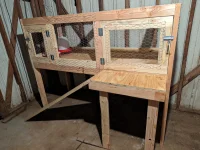
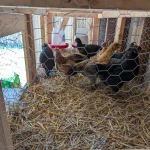
First, here' the pen we built for the little chicks. We built it, then moved it into the main chicken coop, just because we thought it'd help acclimate any new chicks into the coop and, more importantly, into the flock. The only changes we've made to this since this photo is that we extended the top of it all the way to the top of the coop. The reason for this is because when we let the chickens out of it, they wanted to roost on top of this thing instead of on the roost I built for them. That's just followed by a side-view of the original chicks in there. That photo was taken shortly before they were big enough to let out of the pen and into the large coop.
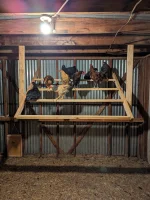
Here's a look at their roost, after I finally got them to roosting on it. This is all of the original chickens (2 pullets and 7 cockerels). The black one on the lower step here is one of the, now hens, that we still have.
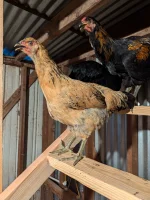
Here's a picture of the rooster that we kept, (the black/brown one up top), along with the other original hen that we still have (the golden one). They're MUCH bigger now. Especially the rooster! He's a giant! I'll have to get some updated photos to show him off when I can (definitely not until after this cold spell is gone).
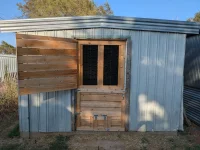
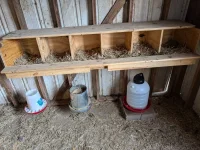
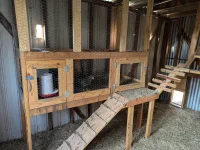
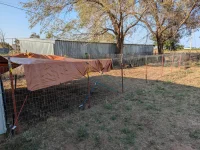
Then here are just some random photos I've taken of the coop. The first one is a photo of the front door to the coop. We open that top door during the day, and close it at night. The top half has a screen door, which is what you can see there, then the bottom is another solid door with a little chicken door in it. We don't actually use the chicken door because we decided against letting our chickens free-range. The farm is right next to a busy highway and we didn't want to take any chances. The next photo is one of the laying boxes. Those are the faux eggs in there. They're not in there anymore. We just used to them to "train" the chickens on where to lay. I don't know if they made a difference but all the chickens lay in our boxes. Beneath those (from left to right) is an oyster shell feeder, their actual food feeder (we feed an all-flock feed), and one of their waterers (we have two in the coop). There's also now a gravel feeder under the little chick pen to help them with something to grind up their scratch grains (we feed those daily as well). The next few photos are just of the little chick pen, with the new chicks in it, and the roost again (after I added the steps to make it easier for them to get up on the roost). You can see the door to the run there, too. I used a pulley, some PVC pipe, and some rope on that to make it so that we can open/close it from outside the coop. Finally, the chicken run. It's a pretty good size for the number of chickens we got (more than twice as big as what was recommended), but this year I think I'm going to make it twice as wide yet again. There's another shed next to this one that's just for storage, so I think I'm going to extend the run out to the back of that shed too. I'm also going to make it taller (tall enough that we can walk around in there). I didn't count on the amount of things that somehow find their way into the run (old cans, trash, sticks, etc) and with it being short it's tough to clean out.

Anyways, there you have it. That's our little chicken coop. Hopefully there will be more work done, and more photos taken, this spring. I'll keep y'all posted on any changes. If any of the rest of y'all have chickens I'd love to see your setup!
Once we acclimated those out of the pen and into the larger coop, we ended up buying another 15 chicks. Those were all supposed to be pullets but we did end up with one cockerel. Out of those 15, we did have two die. They were both the same breed (out of the four different breeds we got), so we're assuming a weak breed or they had some sort of disease before we got them.
Anyways, today we now have a total of 12 laying chickens and 2 roosters, only one of which seems to be interested in the females (or maybe the larger rooster won't let the little guy have a turn).
We're getting 9-10 eggs every day (more than we can eat on our own), and a constant source of free fertilizer, which we'll start composting as soon as this cold spell is over. All these chicken droppings should help make for a mighty hot compost pile!
Anyways, here's a quick tour of the ol' chicken coop, and some of the chickens. I just wanted to show them off because I think they're a fine addition to any gardener's farm/ranch/yard.
First, here' the pen we built for the little chicks. We built it, then moved it into the main chicken coop, just because we thought it'd help acclimate any new chicks into the coop and, more importantly, into the flock. The only changes we've made to this since this photo is that we extended the top of it all the way to the top of the coop. The reason for this is because when we let the chickens out of it, they wanted to roost on top of this thing instead of on the roost I built for them. That's just followed by a side-view of the original chicks in there. That photo was taken shortly before they were big enough to let out of the pen and into the large coop.


Here's a look at their roost, after I finally got them to roosting on it. This is all of the original chickens (2 pullets and 7 cockerels). The black one on the lower step here is one of the, now hens, that we still have.

Here's a picture of the rooster that we kept, (the black/brown one up top), along with the other original hen that we still have (the golden one). They're MUCH bigger now. Especially the rooster! He's a giant! I'll have to get some updated photos to show him off when I can (definitely not until after this cold spell is gone).

Then here are just some random photos I've taken of the coop. The first one is a photo of the front door to the coop. We open that top door during the day, and close it at night. The top half has a screen door, which is what you can see there, then the bottom is another solid door with a little chicken door in it. We don't actually use the chicken door because we decided against letting our chickens free-range. The farm is right next to a busy highway and we didn't want to take any chances. The next photo is one of the laying boxes. Those are the faux eggs in there. They're not in there anymore. We just used to them to "train" the chickens on where to lay. I don't know if they made a difference but all the chickens lay in our boxes. Beneath those (from left to right) is an oyster shell feeder, their actual food feeder (we feed an all-flock feed), and one of their waterers (we have two in the coop). There's also now a gravel feeder under the little chick pen to help them with something to grind up their scratch grains (we feed those daily as well). The next few photos are just of the little chick pen, with the new chicks in it, and the roost again (after I added the steps to make it easier for them to get up on the roost). You can see the door to the run there, too. I used a pulley, some PVC pipe, and some rope on that to make it so that we can open/close it from outside the coop. Finally, the chicken run. It's a pretty good size for the number of chickens we got (more than twice as big as what was recommended), but this year I think I'm going to make it twice as wide yet again. There's another shed next to this one that's just for storage, so I think I'm going to extend the run out to the back of that shed too. I'm also going to make it taller (tall enough that we can walk around in there). I didn't count on the amount of things that somehow find their way into the run (old cans, trash, sticks, etc) and with it being short it's tough to clean out.


Anyways, there you have it. That's our little chicken coop. Hopefully there will be more work done, and more photos taken, this spring. I'll keep y'all posted on any changes. If any of the rest of y'all have chickens I'd love to see your setup!
