- Location
- North Texas
- Hardiness zone
- 8a
In my opinion, adding items into our Garden Database is a very simple process. It does require a bit of time, and can be a little daunting, if you're not familiar with the process, so I thought I'd take a little time to show the process of adding an item to the garden database.
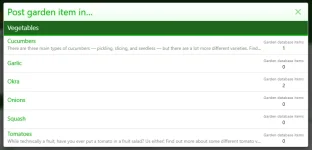
If you'll take a look at the main page of the garden database, at the top of that page you'll notice a button to "Add garden item...". Clicking that, you'll be met with a screen to select the category you want to post your garden item in, which looks like the one pictured below. Please note that if you're already browsing inside a category (okra for example), clicking the "Add garden item..." button will skip this page and automatically select okra as the category.
Here's a look at the category selector screen. There will be more categories added later so it may not look exactly like this.

Here you'll pick the category you want to add an item to. If you don't see a category that fits what you're wanting to add, please let me know and I'll get a new category added for you. I know there are a LOT missing, but I didn't want too many empty categories to start.
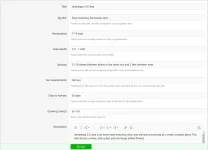
Once you've selected a category to post your item in, you're met with the main form for adding the info about your item (screenshot posted below). The title, tag line, and description are all required fields. The rest of them, while recommended, are not required. Also, those additional fields may be different, depending on what type of item you're adding. For example, if you're adding a flower, we're probably not going to show the field for "days to harvest" or "spacing".
The main section here is what's called the "Description". This is where you'll want to go as much in-depth about the item you're adding as possible. Think of it as a mini research paper. I divide mine up into sections, separated with a bold header, as can be seen in the Jambalaya 2.0 Okra item I added. On that one I added sections for "Planting and sowing", "Care and growing", "Harvest", and "Photo(s)". While recommended, though, this is not required. Write yours up however you think is best. The editor here used the same editor as writing a post so you'll still have all those bold, font, colors, list, etc options available.
Here's a look at the main form for adding an item to the garden database.

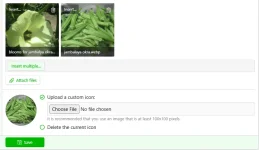
There are even sections for attaching photos, just like attaching photos to a post. Additionally, you can specify an "icon". The icon you choose here will be what's shown when folks are browsing the garden database, and also at the top of the pages for your item. I recommend adding a close-up photo of the item here but, again, that's really up to you.
Here's a look at the attachment/icon sections.

Once everything is filled out completely, simply click "Save" on this form. Your garden item will be saved into the database, and a new discussion thread for this item will be automatically added to the forums. Please note that there may be a short delay before an item is added as, for now, items need to be manually approved.
If, later on or for any reason, you want to edit your item (maybe you need to add/change some information), there is an "Edit" button at the bottom of all your items. This will simply bring up the same form as when you added the item, already filled out with all the information you added. Again, this will be familiar if you've ever edited a post here on the site before. Just make your edits and click "Save".
Now, once you edit/save an item, nothing will really "happen" other than the information will be updated on the item page. If you make a significant change, one that you want to let folks know about, then after you make your changes you can "Post an update". You'll find that button near the top of your item's page. Click that button and you'll be given a form to share details about your update. You'll need to specify an update title and update message. Saving on this form will change the "Updated" time on your item and automatically post into the discussion thread, letting folks know that you've made some updates to the garden item.
Here's a look at the automatic post that was added when I posted an update on my item about adding the photos.

Posting an update is definitely not a mandatory step. It's more of a convenient way for you to let folks know you've made some changes to the item, but will also update the last updated time on the garden item itself. If you simply want to post in the discussion thread that you've made changes, or if you don't want to let folks know you've made changes at all, that's completely up to you.
So, there you go. That's how you can add items directly into our garden database. I appreciate any, and all, help we can get to making this one of the most comprehensive resources for gardeners across the web. If you have any questions, please don't hesitate to ask.
If you'll take a look at the main page of the garden database, at the top of that page you'll notice a button to "Add garden item...". Clicking that, you'll be met with a screen to select the category you want to post your garden item in, which looks like the one pictured below. Please note that if you're already browsing inside a category (okra for example), clicking the "Add garden item..." button will skip this page and automatically select okra as the category.
Here's a look at the category selector screen. There will be more categories added later so it may not look exactly like this.

Here you'll pick the category you want to add an item to. If you don't see a category that fits what you're wanting to add, please let me know and I'll get a new category added for you. I know there are a LOT missing, but I didn't want too many empty categories to start.
Once you've selected a category to post your item in, you're met with the main form for adding the info about your item (screenshot posted below). The title, tag line, and description are all required fields. The rest of them, while recommended, are not required. Also, those additional fields may be different, depending on what type of item you're adding. For example, if you're adding a flower, we're probably not going to show the field for "days to harvest" or "spacing".
The main section here is what's called the "Description". This is where you'll want to go as much in-depth about the item you're adding as possible. Think of it as a mini research paper. I divide mine up into sections, separated with a bold header, as can be seen in the Jambalaya 2.0 Okra item I added. On that one I added sections for "Planting and sowing", "Care and growing", "Harvest", and "Photo(s)". While recommended, though, this is not required. Write yours up however you think is best. The editor here used the same editor as writing a post so you'll still have all those bold, font, colors, list, etc options available.
Here's a look at the main form for adding an item to the garden database.

There are even sections for attaching photos, just like attaching photos to a post. Additionally, you can specify an "icon". The icon you choose here will be what's shown when folks are browsing the garden database, and also at the top of the pages for your item. I recommend adding a close-up photo of the item here but, again, that's really up to you.
Here's a look at the attachment/icon sections.

Once everything is filled out completely, simply click "Save" on this form. Your garden item will be saved into the database, and a new discussion thread for this item will be automatically added to the forums. Please note that there may be a short delay before an item is added as, for now, items need to be manually approved.
If, later on or for any reason, you want to edit your item (maybe you need to add/change some information), there is an "Edit" button at the bottom of all your items. This will simply bring up the same form as when you added the item, already filled out with all the information you added. Again, this will be familiar if you've ever edited a post here on the site before. Just make your edits and click "Save".
Now, once you edit/save an item, nothing will really "happen" other than the information will be updated on the item page. If you make a significant change, one that you want to let folks know about, then after you make your changes you can "Post an update". You'll find that button near the top of your item's page. Click that button and you'll be given a form to share details about your update. You'll need to specify an update title and update message. Saving on this form will change the "Updated" time on your item and automatically post into the discussion thread, letting folks know that you've made some updates to the garden item.
Here's a look at the automatic post that was added when I posted an update on my item about adding the photos.

Posting an update is definitely not a mandatory step. It's more of a convenient way for you to let folks know you've made some changes to the item, but will also update the last updated time on the garden item itself. If you simply want to post in the discussion thread that you've made changes, or if you don't want to let folks know you've made changes at all, that's completely up to you.
So, there you go. That's how you can add items directly into our garden database. I appreciate any, and all, help we can get to making this one of the most comprehensive resources for gardeners across the web. If you have any questions, please don't hesitate to ask.
